How to create and deploy a dockerized Lambda using TypeScript CDK
An application running periodically based on a schedule with no interface to interact with it directly (often called background worker) is quite common in today’s architecture design.
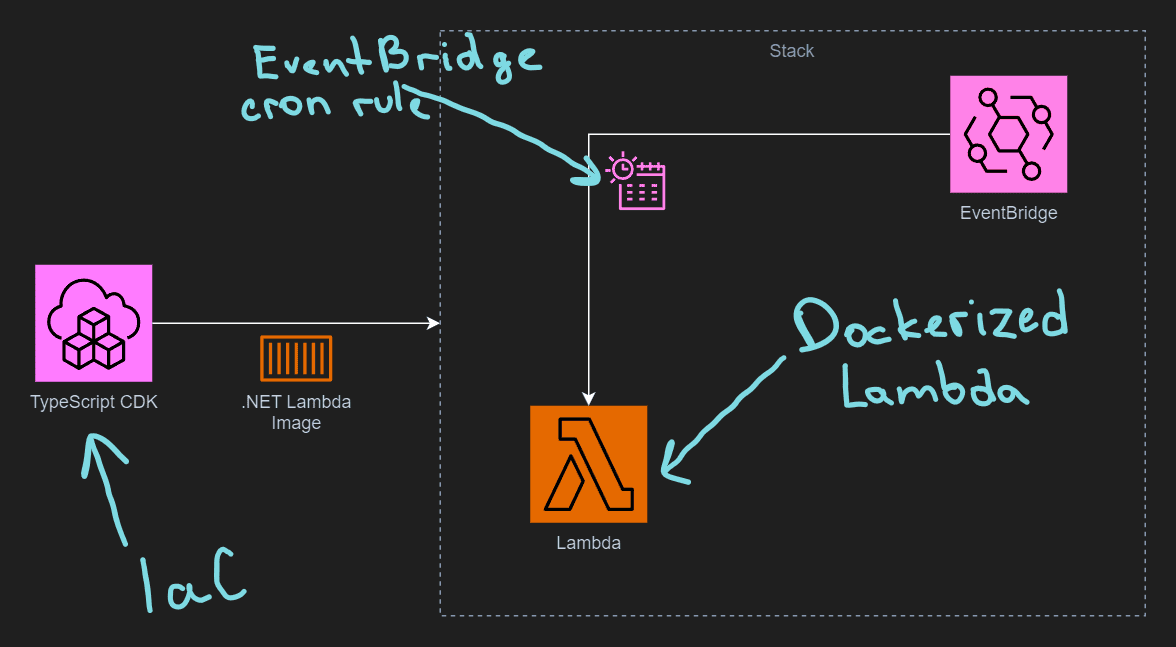
In this article, we’ll explore how we can create a Lambda function using an AWS template, define an EventBridge scheduler to run it automatically and deploy everything to AWS using a Cloud Development Kit (CDK) stack written in TypeScript.
Even though we are using dockerized C# lambda function, any supported language would work just as fine, with CDK code being almost identical.
Some background
.NET Lambda app can be deployed to AWS as a .NET deployment package (.zip file archive) or as a Docker image. The latter option requires some initial work but provides more flexibility in the future since we can control the underlying image.
Of course, the image needs to be stored somewhere, so there is a small additional cost of using Elastic Container Registry (ECR):
There is no additional charge for packaging and deploying functions as container images. When a function deployed as a container image is invoked, you pay for invocation requests and execution duration. You do incur charges related to storing your container images in Amazon ECR.
It probably makes sense to start with a zip archive model and switch to docker later if needed.
We will be working with the containerized model in this article. If you want to follow along make sure you have Docker and .NET 8 installed.
Create a new Lambda app from the template
Let’s start with creating a root folder for our project. In our case, we’ll call it DockerizedLambdaExample.
To create a new lambda function we are going to execute these two commands from a terminal opened in the folder we’ve just created:
dotnet new install Amazon.Lambda.Templates
dotnet new lambda.image.EmptyFunction
And we should end up with this:
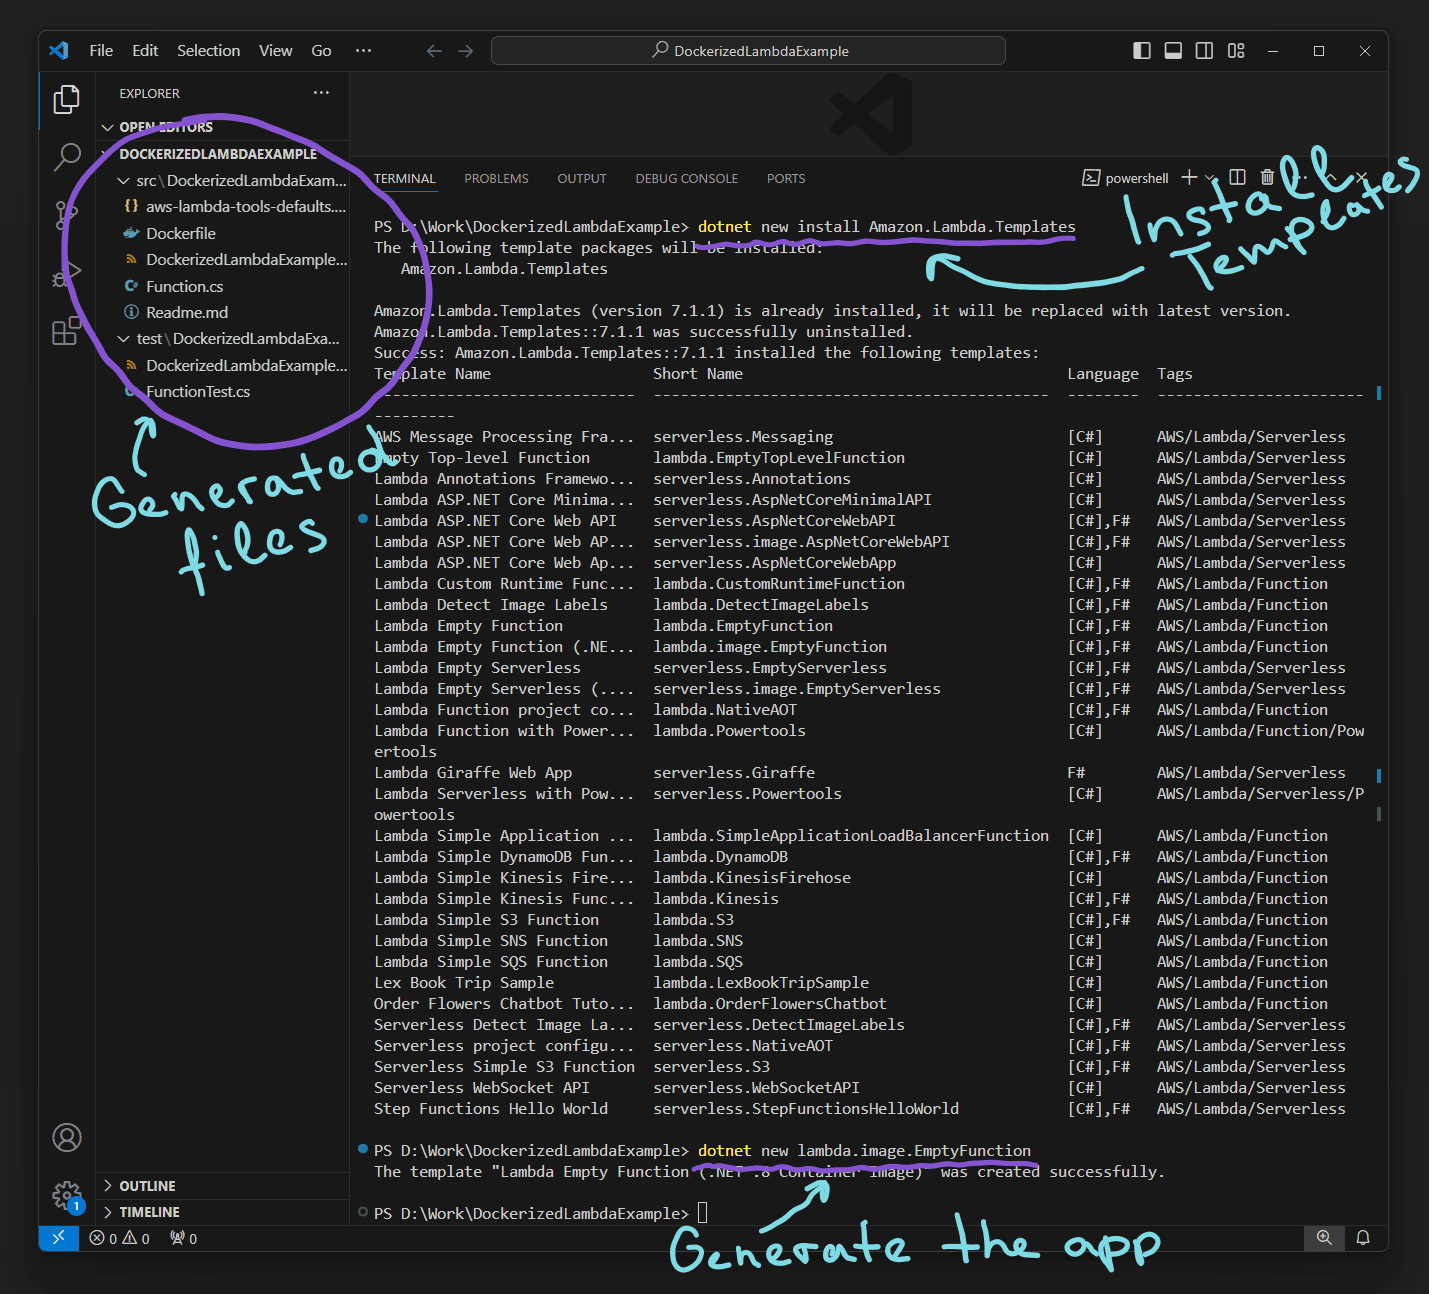
There are two new folders created in our root folders, src and test, with a new .NET project in each one. Readme.md located in src folder is a good starting point.
Inspecting the Dockerfile
By default, you need to execute dotnet build command before you can build the image because the default Dockerfile just copies the pre-built binaries:
The default configuration for the project and the Dockerfile is to build the .NET project on the host machine and then execute the
docker buildcommand which copies the .NET build artifacts from the host machine into the Docker image.Readme.md
I prefer to build the lambda inside the Dockerfile and Readme.md conveniently mentions how we can achieve this:
Alternatively the Docker file could be written to use multi-stage builds and have the .NET project built inside the container.
Readme.md
So let’s change the generated Dockerfile with the alternative one provided in Readme.md:
FROM public.ecr.aws/lambda/dotnet:8 AS base

FROM mcr.microsoft.com/dotnet/sdk:8.0 as build
WORKDIR /src
COPY ["DockerizedLambdaExample.csproj", "DockerizedLambdaExample/"]
RUN dotnet restore "DockerizedLambdaExample/DockerizedLambdaExample.csproj"

WORKDIR "/src/DockerizedLambdaExample"
COPY . .
RUN dotnet build "DockerizedLambdaExample.csproj" --configuration Release --output /app/build

FROM build AS publish
RUN dotnet publish "DockerizedLambdaExample.csproj" \
            --configuration Release \
            --runtime linux-x64 \
            --self-contained false \
            --output /app/publish \
            -p:PublishReadyToRun=true

FROM base AS final
WORKDIR /var/task
COPY --from=publish /app/publish .
Inspecting the code
Let’s inspect the function’s code in Function.cs:
using Amazon.Lambda.Core;

// Assembly attribute to enable the Lambda function's JSON input to be converted into a .NET class.
[assembly: LambdaSerializer(typeof(Amazon.Lambda.Serialization.SystemTextJson.DefaultLambdaJsonSerializer))]

namespace DockerizedLambdaExample;

public class Function
{

    /// <summary>
    /// A simple function that takes a string and returns both the upper and lower case version of the string.
    /// </summary>
    /// <param name="input">The event for the Lambda function handler to process.</param>
    /// <param name="context">The ILambdaContext that provides methods for logging and describing the Lambda environment.</param>
    /// <returns></returns>
    public Casing FunctionHandler(string input, ILambdaContext context)
    {
        return new Casing(input.ToLower(), input.ToUpper());
    }
}

public record Casing(string Lower, string Upper);
As we can see, it takes a string and returns a lower- and upper-cased version of the input. Since we are implementing a background job-like lambda, let’s remove the parameter and return “Hello world from Lambda function!” string instead:
public class Function
{
    public string FunctionHandler(ILambdaContext context)
    {
        return "Hellow World from Lambda Function!";
    }
}
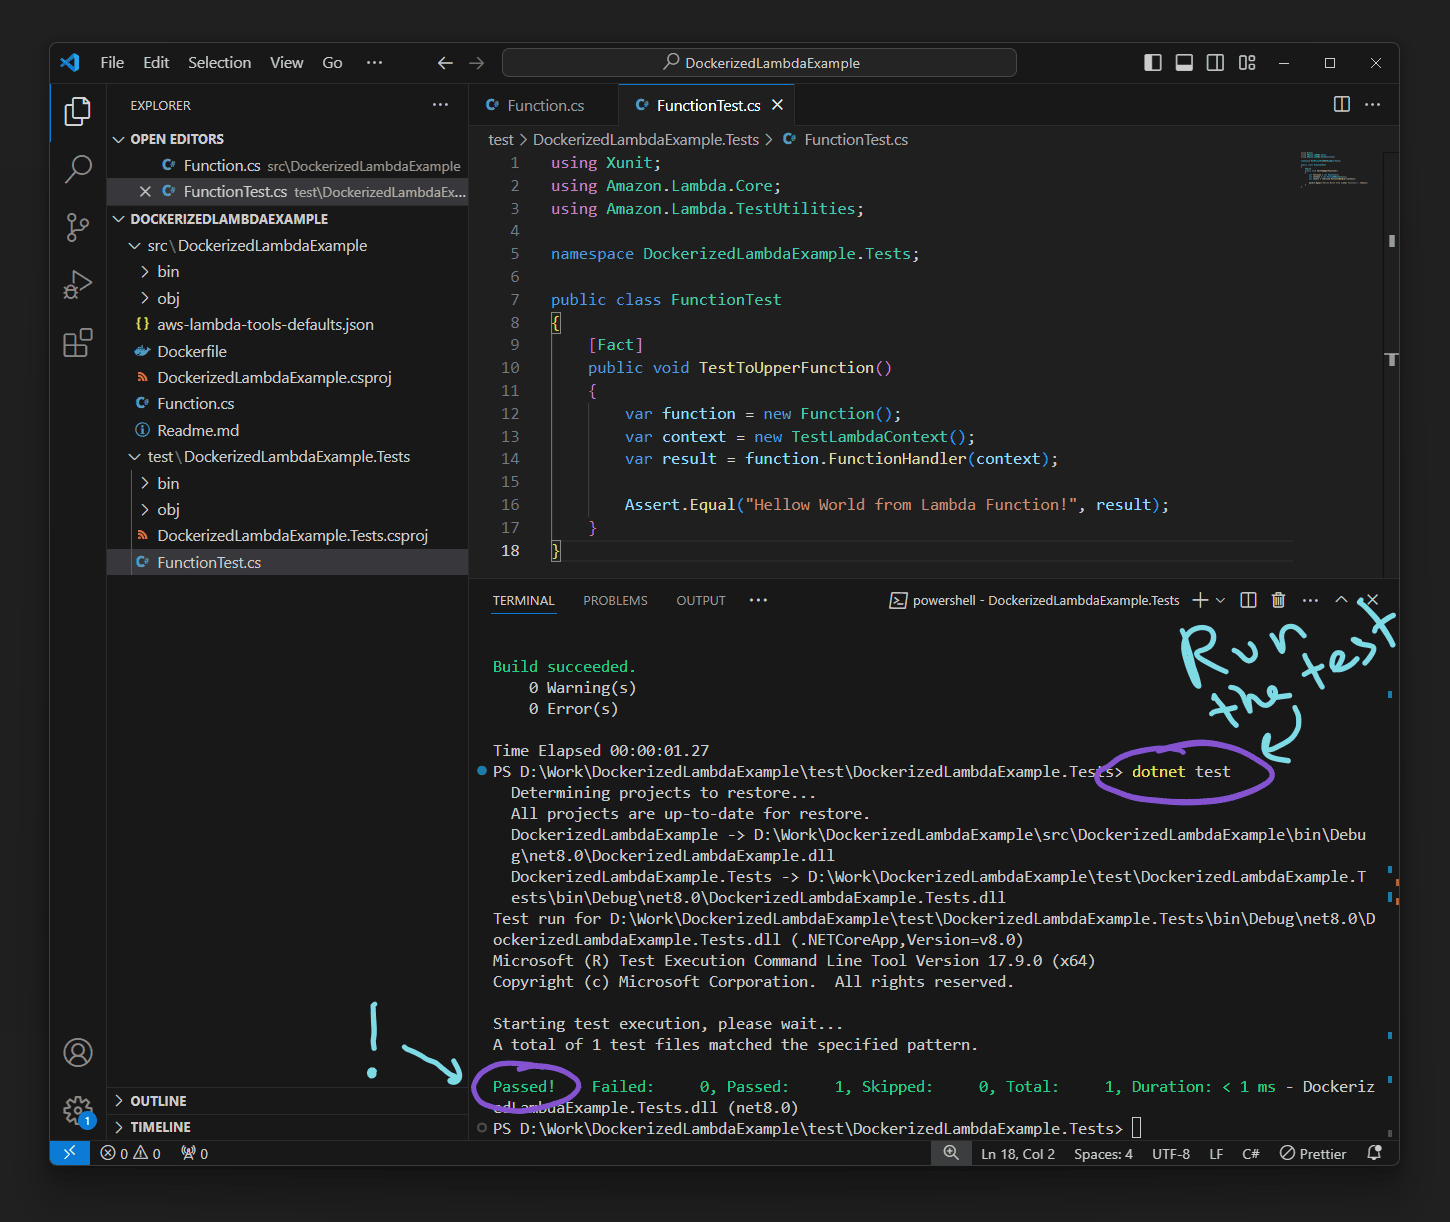
Now we need to adjust the unit test, let’s replace the FunctionTest.cs class in the test folder with this:
public class FunctionTest
{
    [Fact]
    public void TestToUpperFunction()
    {
        var function = new Function();
        var context = new TestLambdaContext();
        var result = function.FunctionHandler(context);

        Assert.Equal("Hellow World from Lambda Function!", result);
    }
}
We can verify the test passes by running dotnet test from the folder with the test project:
Creating CDK stack
We have created and tested our Lambda function, so now it’s time to define our IaC stack.
Serverless applications usually comprise a combination of Lambda functions and other managed AWS services working together to perform a particular business task. AWS SAM and AWS CDK simplify building and deploying Lambda functions with other AWS services at scale.
Let’s create a new folder called cdk in the root folder and execute the following command to create a new CDK app inside this folder:
cdk init app --language typescript
It will create a new bootstraped CDK app and we want to replace lib/cdk-stack.ts content with:
import * as cdk from "aws-cdk-lib";
import { DockerImageCode, DockerImageFunction } from "aws-cdk-lib/aws-lambda";
import { Construct } from "constructs";
import * as events from "aws-cdk-lib/aws-events";
import * as targets from "aws-cdk-lib/aws-events-targets";

export class CdkStack extends cdk.Stack {
  constructor(scope: Construct, id: string, props?: cdk.StackProps) {
    super(scope, id, props);

    const lambdaFn = new DockerImageFunction(this, "DockerizedLambdaExample", {
      code: DockerImageCode.fromImageAsset("../src/DockerizedLambdaExample", {
        cmd: [
          "DockerizedLambdaExample::DockerizedLambdaExample.Function::FunctionHandler",
        ],
      }),
      timeout: cdk.Duration.seconds(600),
    });

    // Run the eventbridge every minute
    const rule = new events.Rule(this, "Rule", {
      schedule: events.Schedule.expression("cron(* * ? * * *)"),
    });

    // Add the lambda function as a target to the eventbridge
    rule.addTarget(new targets.LambdaFunction(lambdaFn));
  }
}
In the “code” section of DockerImageFunction we point our asset to the folder with the Dockerfile - ../src/DockerizedLambdaExample, we also provide the CMD option which we can take from our generated aws-lambda-tools-defaults.json.
The next thing we need to define is our EventBridge rule, which uses a cron expression, in our case, it will run the function each minute.
The final step is to add our lambda as the target of the rule.
Let’s verify our CDK stack is correct by running cdk synth in cdk folder, it should produce YAML file in the terminal and new cdk.out folder with JSON templates.
You can now deploy your app using cdk deploy command.
The source code is available here.