Publish docker images to Azure Container Registry with dotnet publish
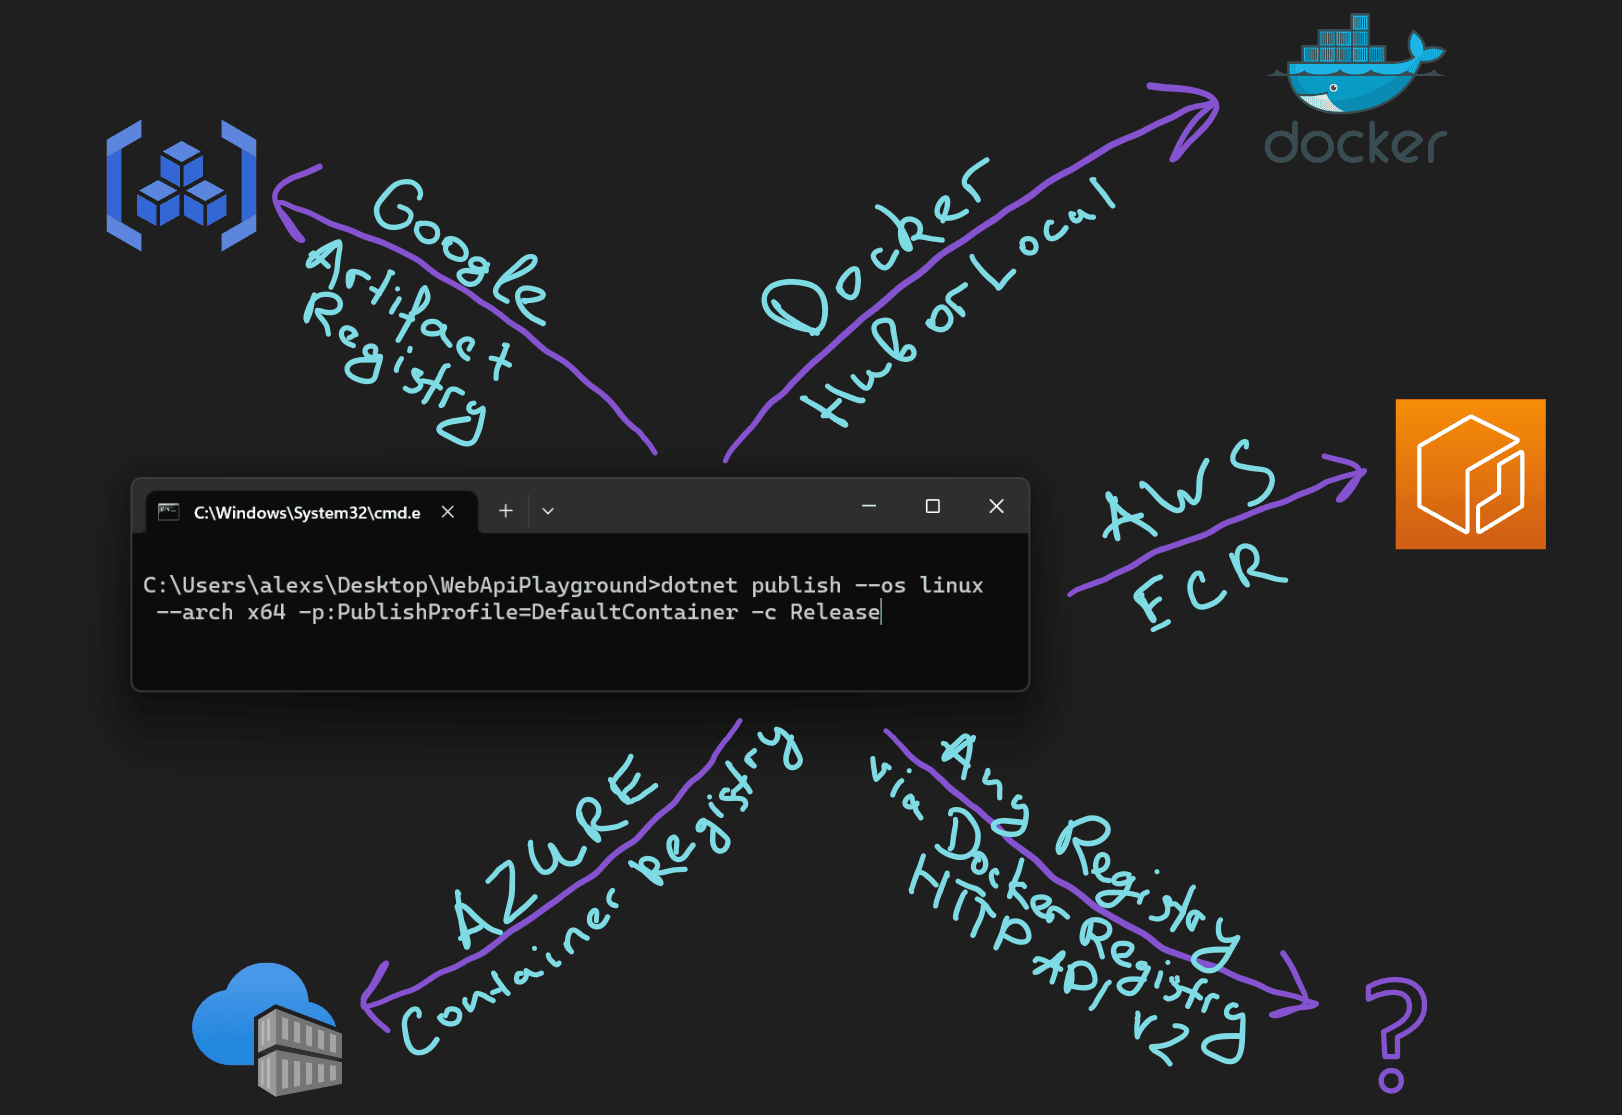
In the previous article we explored how we can generate docker images of .NET applications and push them to the local Docker Desktop daemon.
Let’s now review how we can push a Docker image to a remote registry. We’ll be using Azure Container Registry as our destination, although the process is similar for all Docker Registries.
Create an Azure Container Registry
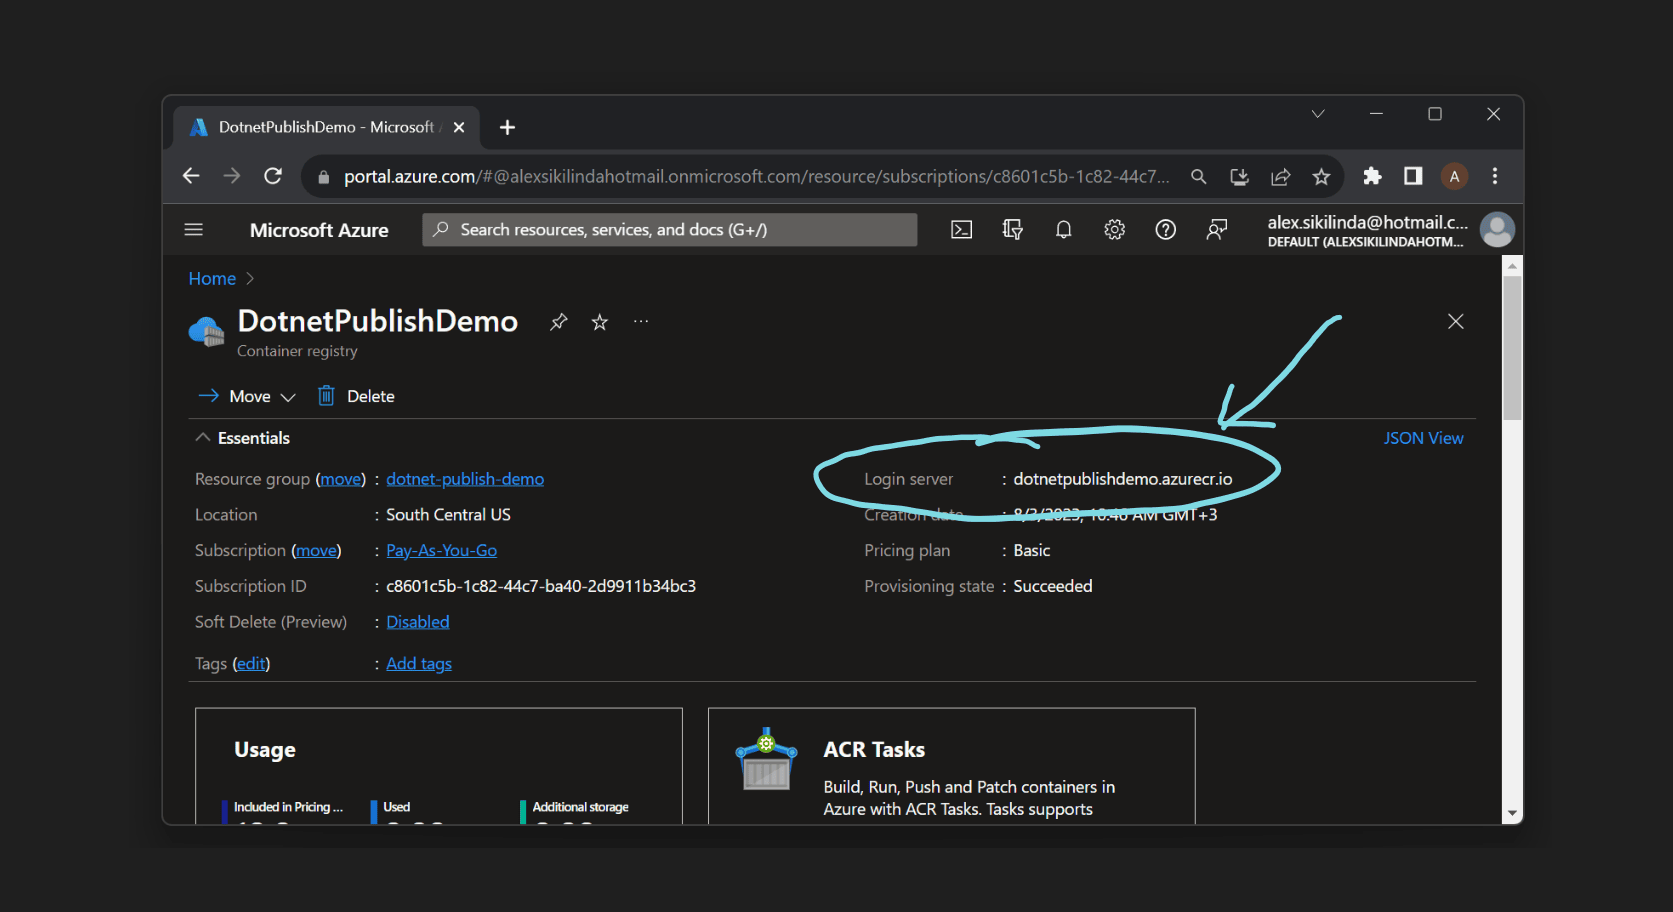
Login to your Azure account, and create a new Azure Container Registry. We are going to need the name and the Login server.
Connect dotnet publish with the remote registry
Now we need to tell dotnet publish that we want to use a remote registry. We are already familiar with dotnet publish configuration via .csproj file, so we are going to add a new <ContainerRegistry> element, so the full .csproj file looks like this:
<Project Sdk="Microsoft.NET.Sdk.Web">

  <PropertyGroup>
    <TargetFramework>net7.0</TargetFramework>
    <Nullable>enable</Nullable>
    <ImplicitUsings>enable</ImplicitUsings>
    <ContainerImageName>hello-world-dotnet-publish</ContainerImageName>
    <ContainerImageTag>1.0.0</ContainerImageTag>
    <ContainerRegistry>dotnetpublishdemo.azurecr.io</ContainerRegistry>
  </PropertyGroup>

  <ItemGroup>
    <PackageReference Include="Microsoft.NET.Build.Containers" Version="7.0.306" />
  </ItemGroup>

</Project>
At this point, dotnet publish will try to push our image to the specified container registry. Do not forget to change dotnetpublishdemo.azurecr.io to your login server.
If you run it now you will notice that we are getting an error:
error CONTAINER1013: Failed to push to the output registry: Microsoft.NET.Build.Containers.Credentials.CredentialRetrievalException: CONTAINER1008: Failed retrieving credentials for "dotnetpublishdemo.azurecr.io"
Of course, we need to authenticate before we can push or pull docker images to Azure Container Registry. To do this we need to create a service principle and execute docker login command.
Create a new service principal
There are a few ways we can authenticate Azure CR. We are going to use a service principal authentication since it will also work in a “headless” CI build we will use in future.
Let’s create a new service principal for our Container Registry by executing these commands in Azure Cloud Shell (change ACR_NAME to your Azure Container Registry name and SERVICE_PRINCIPAL_NAME your preferred name):
ACR_NAME=DotnetPublishDemo
SERVICE_PRINCIPAL_NAME=MyDotnetPublishServicePrincipal
ACR_REGISTRY_ID=$(az acr show --name $ACR_NAME --query "id" --output tsv)
PASSWORD=$(az ad sp create-for-rbac --name $SERVICE_PRINCIPAL_NAME --scopes $ACR_REGISTRY_ID --role acrpush --query "password" --output tsv)
USER_NAME=$(az ad sp list --display-name $SERVICE_PRINCIPAL_NAME --query "[].appId" --output tsv)
echo "Service principal ID: $USER_NAME"
echo "Service principal password: $PASSWORD"
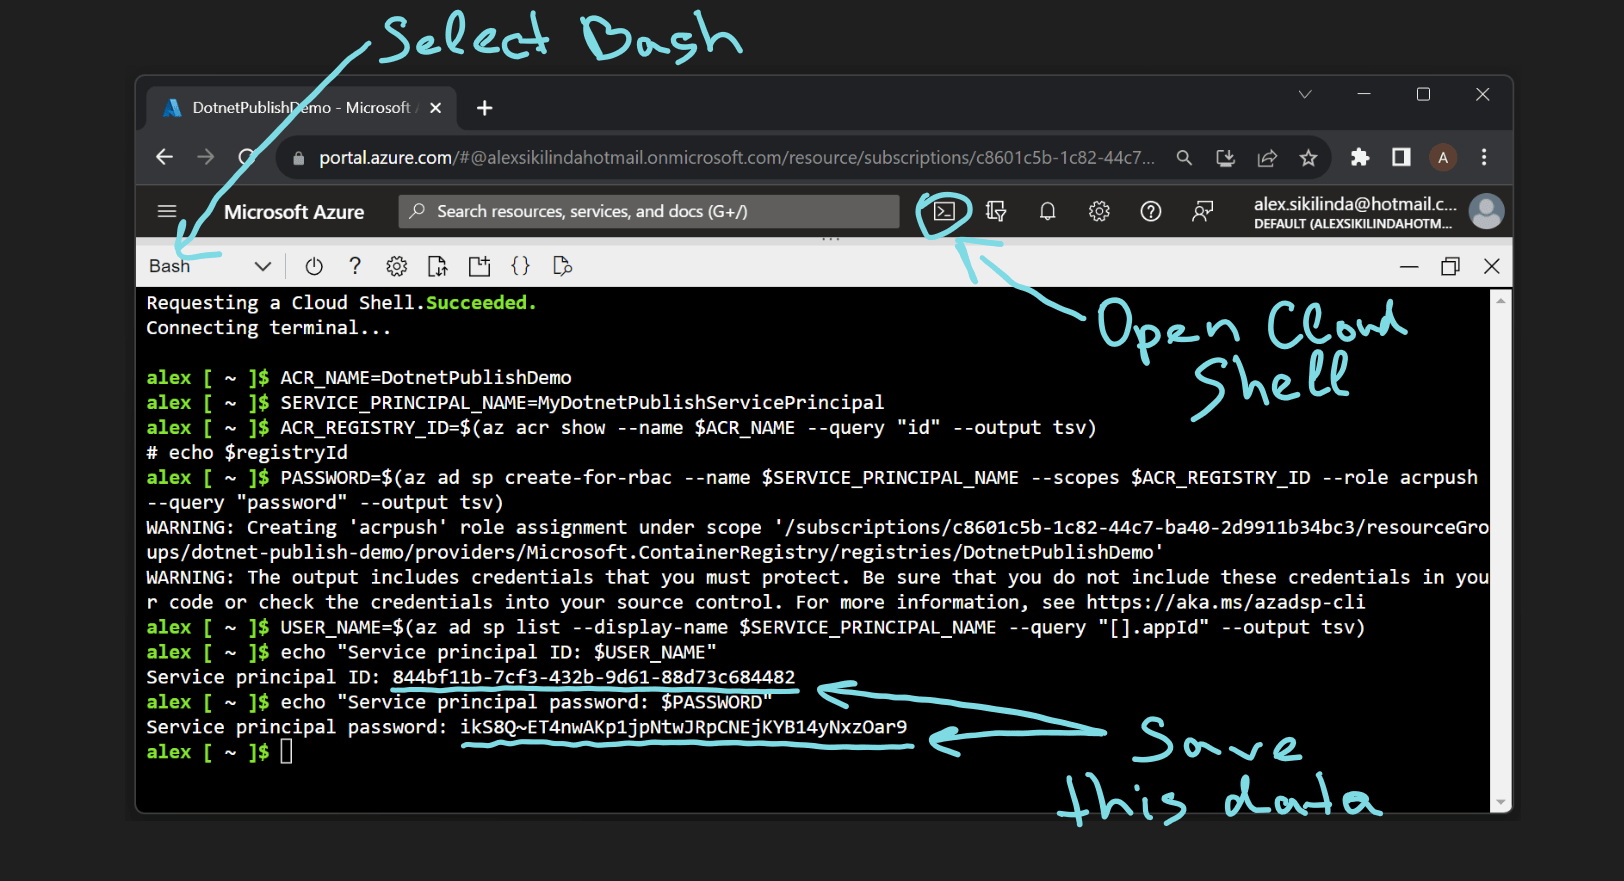
We are going to need your principal id and password, so save it somewhere temporarily. Your service principal password is sensitive information, treat it accordingly.
Authenticate with docker login
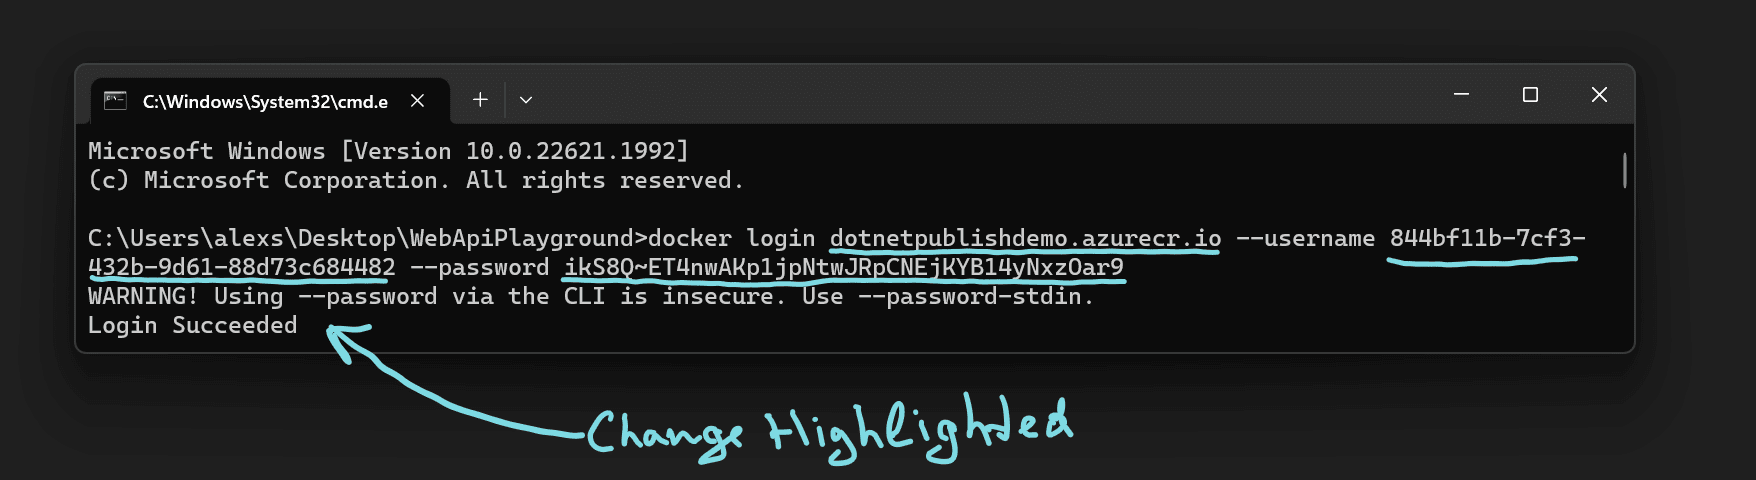
Execute docker login replacing myregistry.azurecr.io with your Login server, $SP_APP_ID with your principal id and $SP_PASSWD with its password:
docker login myregistry.azurecr.io --username $SP_APP_ID --password $SP_PASSWD
And after pressing enter, you should see Login Succeeded:
Since we are successfully authenticated, we now can execute our dotnet publish --os linux --arch x64 -p:PublishProfile=DefaultContainer -c Release command, this time seeing
Pushed container 'hello-world-dotnet-publish:1.0.0' to registry 'dotnetpublishdemo.azurecr.io'
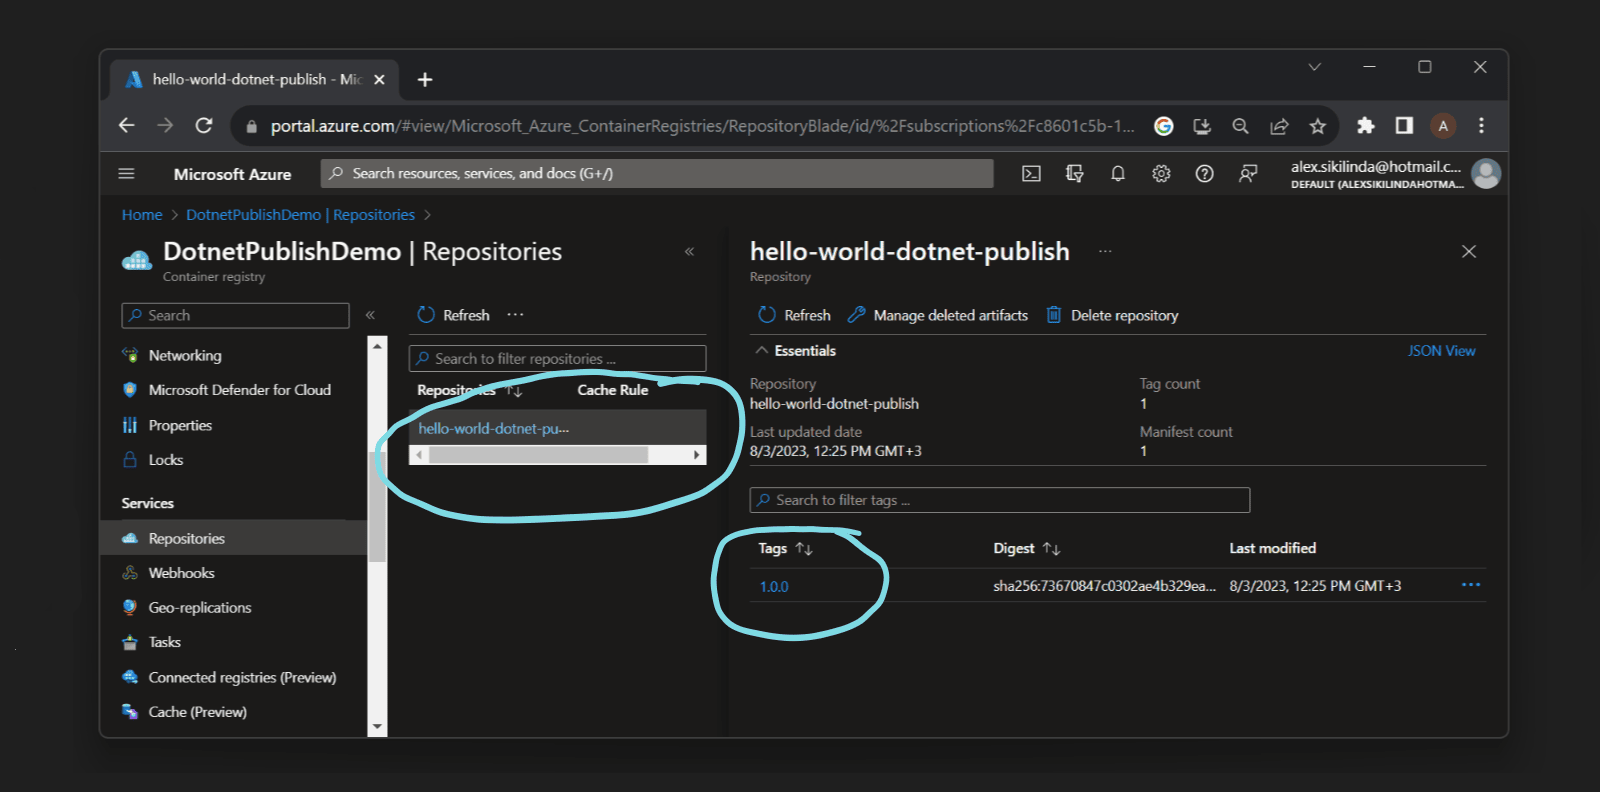
And we can also check it in Azure Portal, navigate to Services > Repositories of Container Registry, you should be able to see your image:
Summary
dotnet publishcan be used to push Docker images to remote registries, such as Azure Container Registry.- The remote registry is configured in
<ContainerRegistry>inside.csprojfile. - Publishing to remote registries usually requires authentication with
docker login. - Azure Container Registry authentication can be done using a custom Service Principal. This is the recommended approach for “headless” scenarios, such as CI build, but also can be used locally.